Phenomenal . . .

Phenomenal . . .
Life, Growth, and Connection (This sunflower was nourished by my hands.) 2010; Photography by Benita Blocker. Please become a follower of this blog.

Total Pageviews

Tuesday, April 9, 2013

Peer Pressure to be Pretty: Custom Looks


Hair and Makeup by Benita Blocker. 

I am loving the compliments on my new custom look.  People love the colors.  I used four different colors that I am probably never going to be able to duplicate again.  One of the colors is like a #6? and one of the colors I was experimenting with darkening blonde hair.  The amazing thing is that I would never color my own hair because of my tight curl pattern.  In addition, relaxer plus coloring is considered double processing, and anyone with double chemical processes compromises the integrity of their hair.


 Hair and Makeup by Benita Blocker.

As far as styling, I was trying to recreate my invisible braids look that I had a few years back.  Please see my separate article on invisible braids.  I can never find a wig to fall in the right places to frame my own face.  It is hard to buy a Customized look.  The cap of most wigs are for a mannequin head.  My head has never conformed to the perfect headshape of a mannequin.


Hair and Makeup by Benita Blocker.

With a custom made wig, I can achieve my crown lift right where I need it on my head.  I can get my length and partings to complement my own facial features.

I could not have purchased a wig from a catalog with the color and fit that this handmade unit delivers.

Questions about your headshape?  Please see my separate article about headshapes for wigs.

Peer pressure and politics drive us as children, young adults, and older adults.  The pressure to be pretty . . .

My hair never defined my intelligence nor my drive for life, but having the right look at the right time can make life so much easier.


Sunday, April 7, 2013

2013 Hair Quiz: How do you Score on hair?


1) Is "dead hair" and "damaged hair" the same thing?

2) How long do most people wear hair extensions before their own hair grows out long enough to go extension free?

3) Should you get damaged ends trimmed away before adding hair extensions?

4) Can semi-permanent dye or a rinse permanently change your haircolor?

5) Should your hairstylist rinse your chemical out or is it okay for the "shampoo girl" to do it?


The Answers:

1) "Dead hair" and "Damaged hair" are two different things.  All hair is dead.  If you cut your finger or your scalp then you bleed.  If you cut your hair, then you do not feel it because it is all dead.  Now, damaged hair is what you want trimmed away.

2) Most of my clients wear hair extensions about 16 to 18 months before they feel comfortable to go extension free. That's about a year and a half or 8 to 9 inches of new growth.

3)  Definitely do NOT go get a haircut then ask for hair extensions.  It is hard to blend a blunt haircut into hair extensions. Also, haircuts create more movement.  If you are trying to cover hair extensions, you do not need your hair moving opposite of the extension hair.  If you must get a haircut before your hair extensions arrive in the mail, then only ask for a very conservative trim.  Don't try to get everything completely even.  It is best to wear an updo or a hair accessory until the extension service can be completed and your hair is then cut and blended in.

4)  If you are flat ironing or using a lot of hot iron styling, then yes, everything on the hair can get pressed into the hair shaft.  Your rinse or "semi-permanent" color can become more permanent because it is being "baked" on.

5)  I strongly recommend that the hairstylist performing the chemical service do all of the rinsing and shampooing.  The shampoo girl is best for non-chemical services and rinsing conditioners out.  I would prefer to have a skilled eye on my hair when neutralizing a chemical.

So how did you score?

You had to get 3 out of 5 questions right to pass.  So comment and let me know if you passed or not!


Custom Made Removable Quickweave Wig


Custom Made Removable Quickweave Wig by Hairstylist Benita Blocker, 2013.

 My primary concern was to prevent any glue from getting in my Sisterlocks/hair.  Secondly, I wanted to create a straight, corporate look that I can grab that was custom fit to my own head!  Human hair that I can maintain as needed.

I started out with the U-Be Cap.  It is breathable; yet, it was designed to prevent glue from penetrating onto your hair.

Since the U-Be caps are no longer made, I wanted to protect it for reuse in the future.  I used wrap strips and paper towels held by a dot of hair glue to cover my U-Be cap.  According to the online reviews, the U-Be caps slipped off too easily. Most people complained about it moving around on their head during the day.      I am just using it as my first barrier against the hair glue.


I decided on using a wave cap versus a wig cap versus a weave cap.  I will have to do a separate article about the differences between the three caps.  I picked the wave cap because it fit really, really, tight and snug. I have heard others complained about wig caps loosening up so I figured the tighter, the better.  In addition, I had extra barriers plus my Sisterlocks to keep as compact as possible.

I started the quickweave at the back using Milky Way hair.

 The brown area on the wave cap is Roux Tween Time stick in Medium Brown color.  This area is marked for my invisible part.  ( Please see my other articles on this product and technique.)

I also planned to use the infusion hairline technique so the wefts can be placed however I need them to fall.  Please see my other articles for techniques.


I anchored some of the hair down to close out the unit.   Makeup by Benita Blocker.


I ended up tying a knot in the top of the wave cap. Then I glued underneath the knot.  Then I cut the knot off.  I then had a flat top to lay the remaining wefts on.


I custom closed this unit.  No separate closure piece was used.


I had completed all that I could complete while it was on my head!  


 So I took the new unit off.  I removed the U-Be cap.  Only a little paper towel residue was on it.  My hair was all clear.  My Sisterlocks were safe.


I wanted to use the sunlight for a better picture.  I cut and curled my new unit on the mannequin head and tripod.    


I also completed the infusion hairline while on the mannequin stand.  I found it hard to complete infusion hairline on my own head.  I could not get precision with my angling of my hands while the unit was on top of my head.  So the mannequin stand was great to finish the unit up and allow it to dry inside from the hair glue.  I did not want any residue on my own hair so I let it dry out.


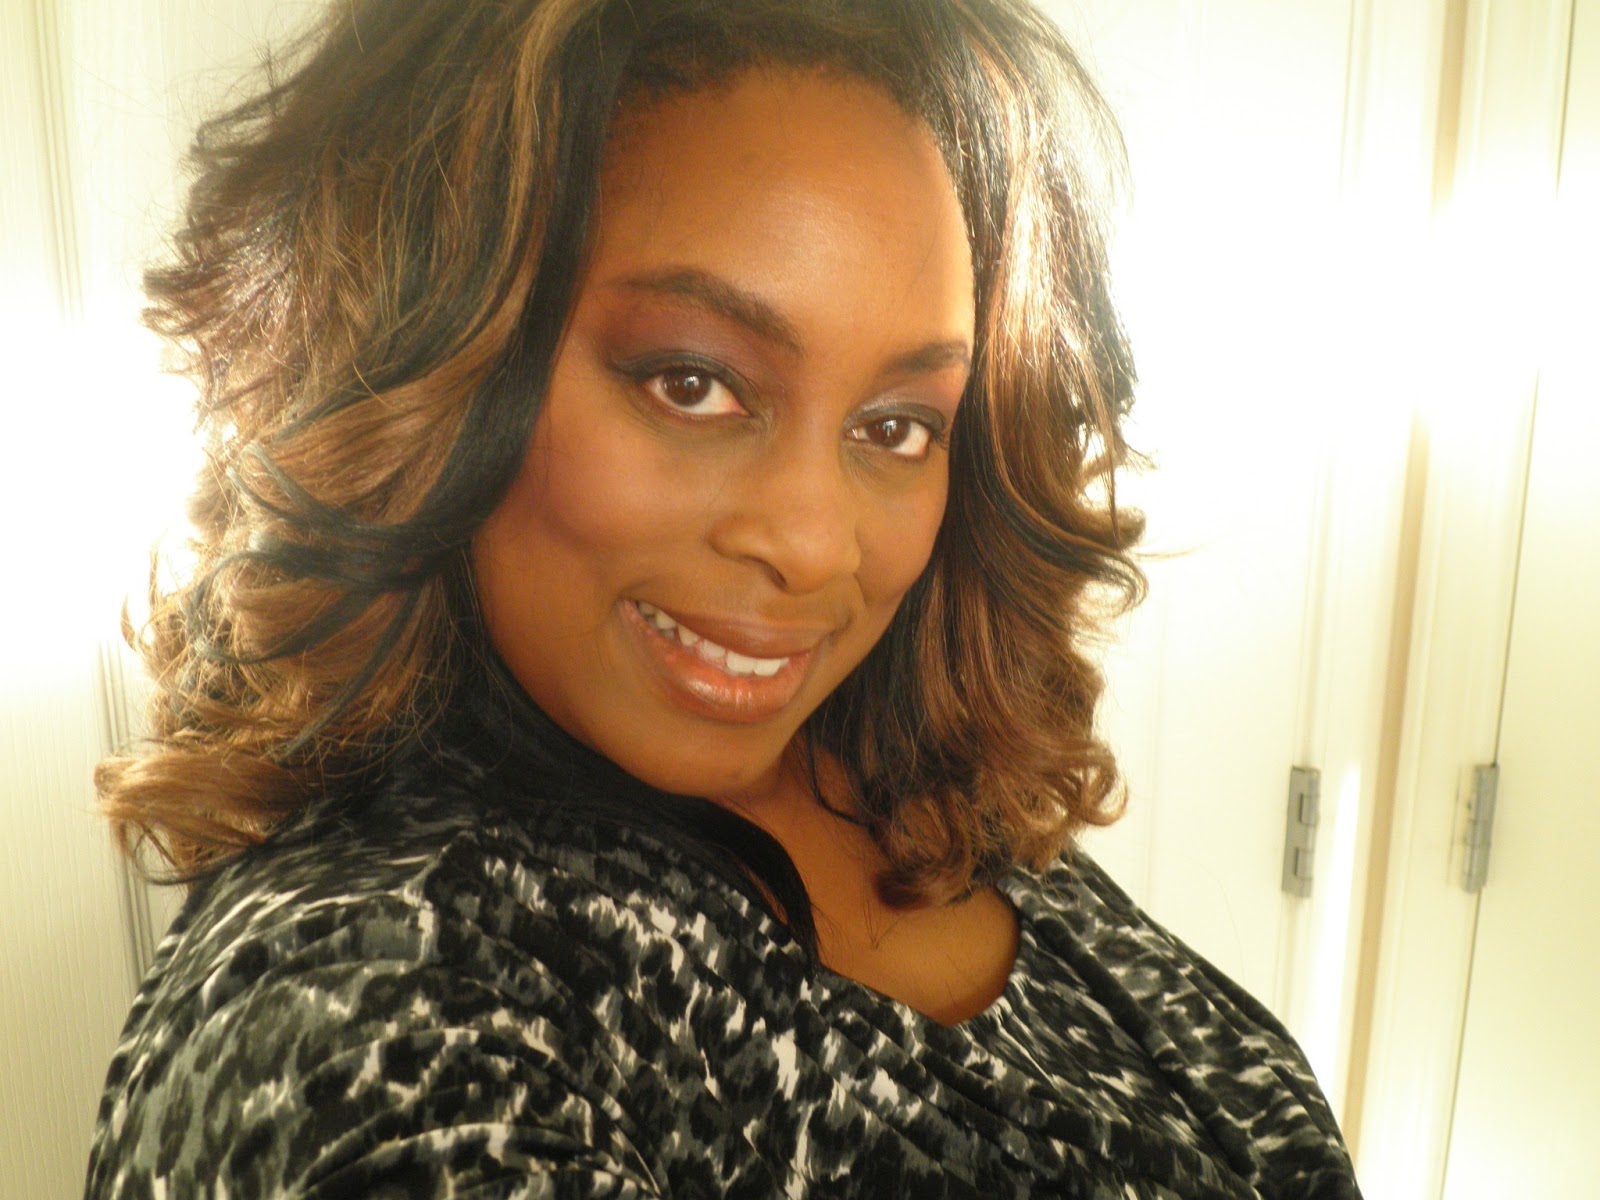
I love my new unit!!!!  Hair by Benita Blocker, 2013.


 I used to cheap to mid-grade hair for this quickweave.  Sassy (from Sallys Beauty Supply), Joie Joie,  Milky Way.  I had a lot of inventory hair that needed to be used up.  It was not Remy, but it is better than some of the hybrid hair they have on the market now.  Besides, I would not want to put hair glue on Remy hair that I was paying $200 for.  The hair that I used probably appreciated in value over the years.  I am certain that I would have been out of over $100 if I had to buy hair from the store.


I did run out of the Milky Way and Joie Joie hair.  So I had to pull some Dena Cali hair that I had pre-colored as well as some Vienna Collection that I had pre-colored.  It is great to have a stash of hair to grab to piece a style together.


 Black Wrap Strips, hair glue and wave cap that I used for this technique is pictured above.


The medium brown stick that I used to mark the invisible part area.

The U-Be Weave cap package is pictured above.


I used this ceramic, non-ionic, $20 flat iron to curl the entire unit.  It worked fine.  I did not need anything more.

This completes my introduction to my removable Quickweave wig.  I charge around $200 to make this unit. Hair cost is separate.


Friday, April 5, 2013

To Create Texture in Short Locks

 Hair and Makeup by Benita Blocker.

In order to create the texture in this final hairstyle, I used the "Fuzzy Sticks" to flat twist my Sisterlocks.  Most people use the Fuzzy Sticks to create spirals in longer locks as discussed in one of my previous articles on this blog.

However, because I am trying showcase as much length as I can get at all times, I flat twisted my Sisterlocks  two horizontally across the front, and the rest of the flat twists going toward the back.
I dried my hair under the platform dryer until they were completely dry.  I used a wide stretchy headband at  night to stuff my locks to deliver volume at the roots on top of my head and  maintain texture within the ends of my locks.

Pictured above is the textured look after the fuzzy sticks were taken out of the flat twists and fingerstyled.

Unfortunately, my curl pattern still requires me to do something to it at night, otherwise my locks will straighten and stick straight out.  Seriously, I look like I stuck my hand in the electrical socket if I do not use the stuffed headband approach or pin curl them.  So the Sisterlocks are still not "no maintenance."

The biggest advantages that I see so far is that

1) I am not afraid of getting my hair wet
2) I do not have to use another chemical on my hair again
3) my hairline at my nape seems to be filling back in; I had forgotten that it used to be fuller years ago.


Wednesday, April 3, 2013

Iron Deficiency and Hair Loss

It has been documented on such websites as http://en.allexperts.com/q/Hair-Loss-1012/telogen-effluvium-duration.htm that iron deficiency can cause telogen-effluvium or hair loss.  I wrote an article in March 2011 on this blog about how stress and trauma can cause telogen effluvium as well.  Please see my article on Hair loss due to stress.

According to the website listed above, your iron storage level needs to get above "70" for the hair to regrow.

Other websites have mentioned Vitamin C assists with iron absorption; yet, drinking tea can interfere with iron absorption.

Red meats and organ meats are supposed to be good sources of iron.

The Centers for Disease Control and Prevention suggest a standard adult dose of 50 to 60 mg of iron, two times per day for the treatment of anemia.

Read more: http://www.livestrong.com/article/320100-iron-supplement-dosage-for-anemia/#ixzz2PPNk7uXQ

Feeling cold all the time can be a sign of iron deficiency.